QTrobot Motion and Actuators
QTrobot has a full internal metal structure and eight motors with metal gearboxes. Thanks to its advanced compliance motor controllers, QTrobot has flexible joints with overload protection, offering a robust platform for intensive working hours. The smart motors also provide a variety of feedback, including position, velocity, and effort. Combined with QTrobot's gesture and kinematics SDKs, this gives you a flexible foundation for everything from recording and playing gestures to commanding individual joints or driving the arms and gaze in cartesian space.

Software interface
Motion is handled by the motor node in qtrobot-service-hub (ZMQ port 50540), with two layers on top of it:
robot.motor: low-level joint control — list motors, torque on/off, homing, velocity, joint state/error/command streams.robot.gesture: built-in keyframe playback and recording, implemented directly on top of the motor node.robot.kinematics(plugin, Python only currently): inverse kinematics for head gaze and arm reach/aim in cartesian space.
QTrobot supports two motor controller hardware families, Feetech and Herkulex, depending on the robot's hardware revision — the motor node config lives under /opt/luxai/qtrobot_service_hub/etc/motor/feetech/ or .../motor/herkulex/, with one file per joint (head_yaw.yaml, right_shoulder_pitch.yaml, ...) plus a top-level motor.yaml listing the active joints and pointing at them. Which family your robot uses is already configured at the factory — you shouldn't need to change it.
See the Motor, Gesture and Kinematics tutorials, and the Python, TypeScript/Node.js and ROS2 API references for full code.
Joint configuration and limits
QTrobot's joints are grouped into three parts: head, right_arm and left_arm. Each joint's range of motion is enforced both in its per-joint config (pos_limits) and at the embedded motor-controller level — so even a buggy command can't push a joint past its physical limit:
- head
- HeadYaw [min: -60.0, max: 60.0]
- HeadPitch [min: -25.0, max: 25.0]
- right_arm
- RightShoulderPitch [min: -140.0, max: 140.0]
- RightShoulderRoll [min: -75.0, max: -5.0]
- RightElbowRoll [min: -80.0, max: -5.0]
- left_arm
- LeftShoulderPitch [min: -140.0, max: 140.0]
- LeftShoulderRoll [min: -75.0, max: -5.0]
- LeftElbowRoll [min: -80.0, max: -5.0]
These are per-joint software limits, not collision avoidance — QTrobot does not have self-collision awareness. Each joint individually stays within its limit, but a trajectory combining several joints can still bring parts of the robot into contact with each other.
Reading motor feedback and commanding motors
- Python
- TypeScript/Node.js
- ROS2
def on_state(frame):
    print(frame.position("HeadYaw"), frame.velocity("HeadYaw"))

robot.motor.stream.on_joints_state(on_state)

robot.motor.set_velocity("HeadYaw", 50)

from luxai.robot import JointCommandFrame
writer = robot.motor.stream.open_joints_command_writer()
cmd = JointCommandFrame()
cmd.set_joint("HeadYaw", position=30, velocity=40)
writer.write(cmd)
import { JointCommandFrame } from '@luxai-qtrobot/robot-sdk'

robot.motor.onJointsState(frame => console.log(frame.position('HeadYaw')))

const writer = robot.motor.openJointsCommandWriter()
const cmd = new JointCommandFrame()
cmd.setJoint('HeadYaw', { position: 30, velocity: 40 })
await writer.write(cmd)
ros2 topic echo /qtrobot/motor/joints/state/stream
ros2 service call /qtrobot/motor/velocity/set qtrobot_interfaces/srv/MotorVelocitySet \
    "{motor: 'HeadYaw', velocity: 50}"
A command always targets a specific named joint — there's no "send to all joints at once" call; send one command per joint you want to move (you can send several in a row without waiting for each to finish). robot.motor.list() returns every configured motor along with its position_min/position_max/position_home/velocity_max/overload_threshold.
Gestures
robot.gesture plays and records predefined keyframe gestures. QTrobot comes with pre-recorded gestures, located and categorized on QTRP under /home/qtrobot/robot/data/gestures. QTrobot can only play one gesture at a time — a new play request while one is already running is rejected, not queued.
- Python
- TypeScript/Node.js
- ROS2
gestures = robot.gesture.list_files()

h = robot.gesture.play_file_async("QT/bye")
h.cancel()  # if needed
const gestures = await robot.gesture.listFiles()

const play = robot.gesture.playFile({ gesture: 'QT/bye' })
ros2 service call /qtrobot/gesture/file/list qtrobot_interfaces/srv/GestureFileList "{}"
ros2 service call /qtrobot/gesture/file/play qtrobot_interfaces/srv/GestureFilePlay "{gesture: 'QT/bye'}"
Gesture file format
Gesture files are mostly unchanged from earlier QTrobot generations: an XML file under /home/qtrobot/robot/data/gestures (e.g. QT/bye.xml) containing joint position waypoints with timestamps, plus which robot parts are involved and the gesture's total duration:
<?xml version="1.0" encoding="utf-8" standalone="yes" ?>
<gesture>
    <name>QT/bye</name>
    <parts>
        <part>right_arm</part>
    </parts>
    <duration>5.54</duration>
    <waypoints count="97">
        <point time="1558971402671926152">
            <RightElbowRoll>-31.90</RightElbowRoll>
            <RightShoulderPitch>-88.60</RightShoulderPitch>
            <RightShoulderRoll>-59.30</RightShoulderRoll>
        </point>
        <point time="1558971402704626777">
            <RightElbowRoll>-30.60</RightElbowRoll>
            <RightShoulderPitch>-88.60</RightShoulderPitch>
            <RightShoulderRoll>-60.60</RightShoulderRoll>
        </point>
        ...
    </waypoints>
</gesture>
A gesture can involve all parts or just one (e.g. only head). Files can be hand-edited after recording — for example, to trim a trailing delay by deleting the unneeded waypoints at the end.
Recording a gesture
Recording works by releasing torque on the motors you want to capture, moving them by hand, and letting the SDK record the resulting trajectory, using the Python/TypeScript/ROS2 SDKs shown below.
- Python
- TypeScript/Node.js
- ROS2
h = robot.gesture.record_async(
    motors=["RightShoulderPitch", "RightShoulderRoll", "RightElbowRoll"],
    release_motors=True,
    delay_start_ms=2000,
    timeout_ms=20000,
)
input("Press Enter to stop recording...")
robot.gesture.stop_record()
keyframes = h.result()

robot.gesture.play(keyframes)             # play it back immediately
robot.gesture.store_record("my_wave")     # or save it for later playback with play_file()
const recording = robot.gesture.record({
  motors: ['RightShoulderPitch', 'RightShoulderRoll', 'RightElbowRoll'],
  release_motors: true,
  delay_start_ms: 2000,
  timeout_ms: 20000,
})

await robot.gesture.stopRecord()
const keyframes = await recording

await robot.gesture.play({ keyframes })
ros2 service call /qtrobot/gesture/record/start qtrobot_interfaces/srv/GestureRecordStart \
    "{motors: '[\"RightShoulderPitch\", \"RightShoulderRoll\", \"RightElbowRoll\"]', timeout_ms: 20000, release_motors: true}"

# ... move the arm by hand ...

ros2 service call /qtrobot/gesture/record/stop qtrobot_interfaces/srv/GestureRecordStop "{}"
ros2 service call /qtrobot/gesture/record/store qtrobot_interfaces/srv/GestureRecordStore "{gesture: 'QT/my_wave'}"
motors— the list of motors to record; only their movement is captured.release_motors=True— disables torque on those motors for the duration of the recording, so they can be moved freely by hand. This is almost always what you want when recording by hand.delay_start_ms— recording starts this many milliseconds after the call, giving you time to get into position.timeout_ms— a safety cap: recording stops automatically even ifstop_record()is never called.
There's no SDK call to delete a stored gesture — remove its XML file from /home/qtrobot/robot/data/gestures directly to do that.
Keyframe smoothening
Two independent smoothing mechanisms apply at different stages:
- At recording time,
refine_keyframe=True(pluskeyframe_pos_eps/keyframe_max_gap_us) compresses the raw, densely-sampled recording by dropping redundant keyframes that don't meaningfully change the trajectory — useful if you plan to hand-edit the resulting file. - At playback time,
play()/play_async()resample the trajectory by default (resample=True,rate_hz=100.0) to produce smooth motion regardless of how the original keyframes were spaced;speed_factorscales overall playback speed.
# Smoother, slightly compressed recording
robot.gesture.record(motors=[...], release_motors=True, refine_keyframe=True)

# Play back at half speed with a higher resample rate
robot.gesture.play(keyframes, rate_hz=200.0, speed_factor=0.5)
Move the arms/head slowly and smoothly — sharp, fast movements are automatically slowed down by a safety feature, which will distort the gesture you actually wanted to record.
Avoid fast up/down head movements; they can apply excessive force to the neck joints when the gesture is played back.
Recording is easier with an assistant: one person driving the app/SDK, the other moving the robot's parts.
Kinematics (inverse kinematics plugin)
For applications that think in terms of 3-D positions rather than individual joint angles, the robot.kinematics plugin (Python only, currently) solves inverse kinematics for head gaze and arm reach/aim, working in the robot's base frame: origin at the bottom of the robot, x forward, y left-positive, z up, all in metres.
robot.enable_plugin_local("kinematics")
Look at a point (head gaze)
robot.kinematics.look_at_point(1.0, 0.0, 0.6)               # look straight ahead
robot.kinematics.look_at_point(1.0, -0.5, 1.5)               # look to the right
robot.kinematics.look_at_point(1.0, -0.2, 0.6, only_gaze=True)  # eyes only, no head motion
robot.kinematics.look_at_pixel(320, 240, depth=1.0)          # look at a camera pixel
Aim/reach at a point (arm)
robot.kinematics.reach_right(0.3, -0.2, 0.5)   # explicit right arm
robot.kinematics.reach_left(0.3, 0.2, 0.5)     # explicit left arm

robot.kinematics.aim_at_point(0.5, 0.0, 1.0)   # arm auto-selected by sign of y
robot.kinematics.aim_at_pixel(320, 240, depth=1.0)
aim_at_* auto-selects the arm by the sign of y (left arm if y >= 0, right arm if y < 0); reach_left/reach_right let you pick explicitly. Points outside the reachable workspace are clamped to the closest reachable configuration rather than failing outright. Every call has an _async counterpart returning an ActionHandle for non-blocking use (.wait()/.cancel()).
Typical use cases
- Looking toward a detected face or sound source — combine
kinematics.look_at_pixel()with a face/object detection result from the camera, or with the microphone's direction-of-arrival event, to make QTrobot turn toward whoever it's interacting with. - Pointing at or reaching toward an object —
aim_at_pixel()/aim_at_point()to gesture at something the camera has located. - Pure geometry, no motion —
pixel_to_point()converts a camera pixel to a 3-D point in the base frame without moving any motor, useful if you just need the coordinate for your own logic (e.g. logging, deciding whether to react before committing to a movement).
robot.kinematics.configure(...) lets you override the camera intrinsics or motor-wait timeout it uses internally — the defaults already match QTrobot's hardware, so this is rarely needed.
QTrobot URDF
The URDF (Universal Robot Description Format) describes a robot's physical structure: motor positions/orientations, the links between them, and so on. It's useful any time you need that description outside of QTrobot's own software — for example, for visualization, simulation, or motion planning in your own external tooling.
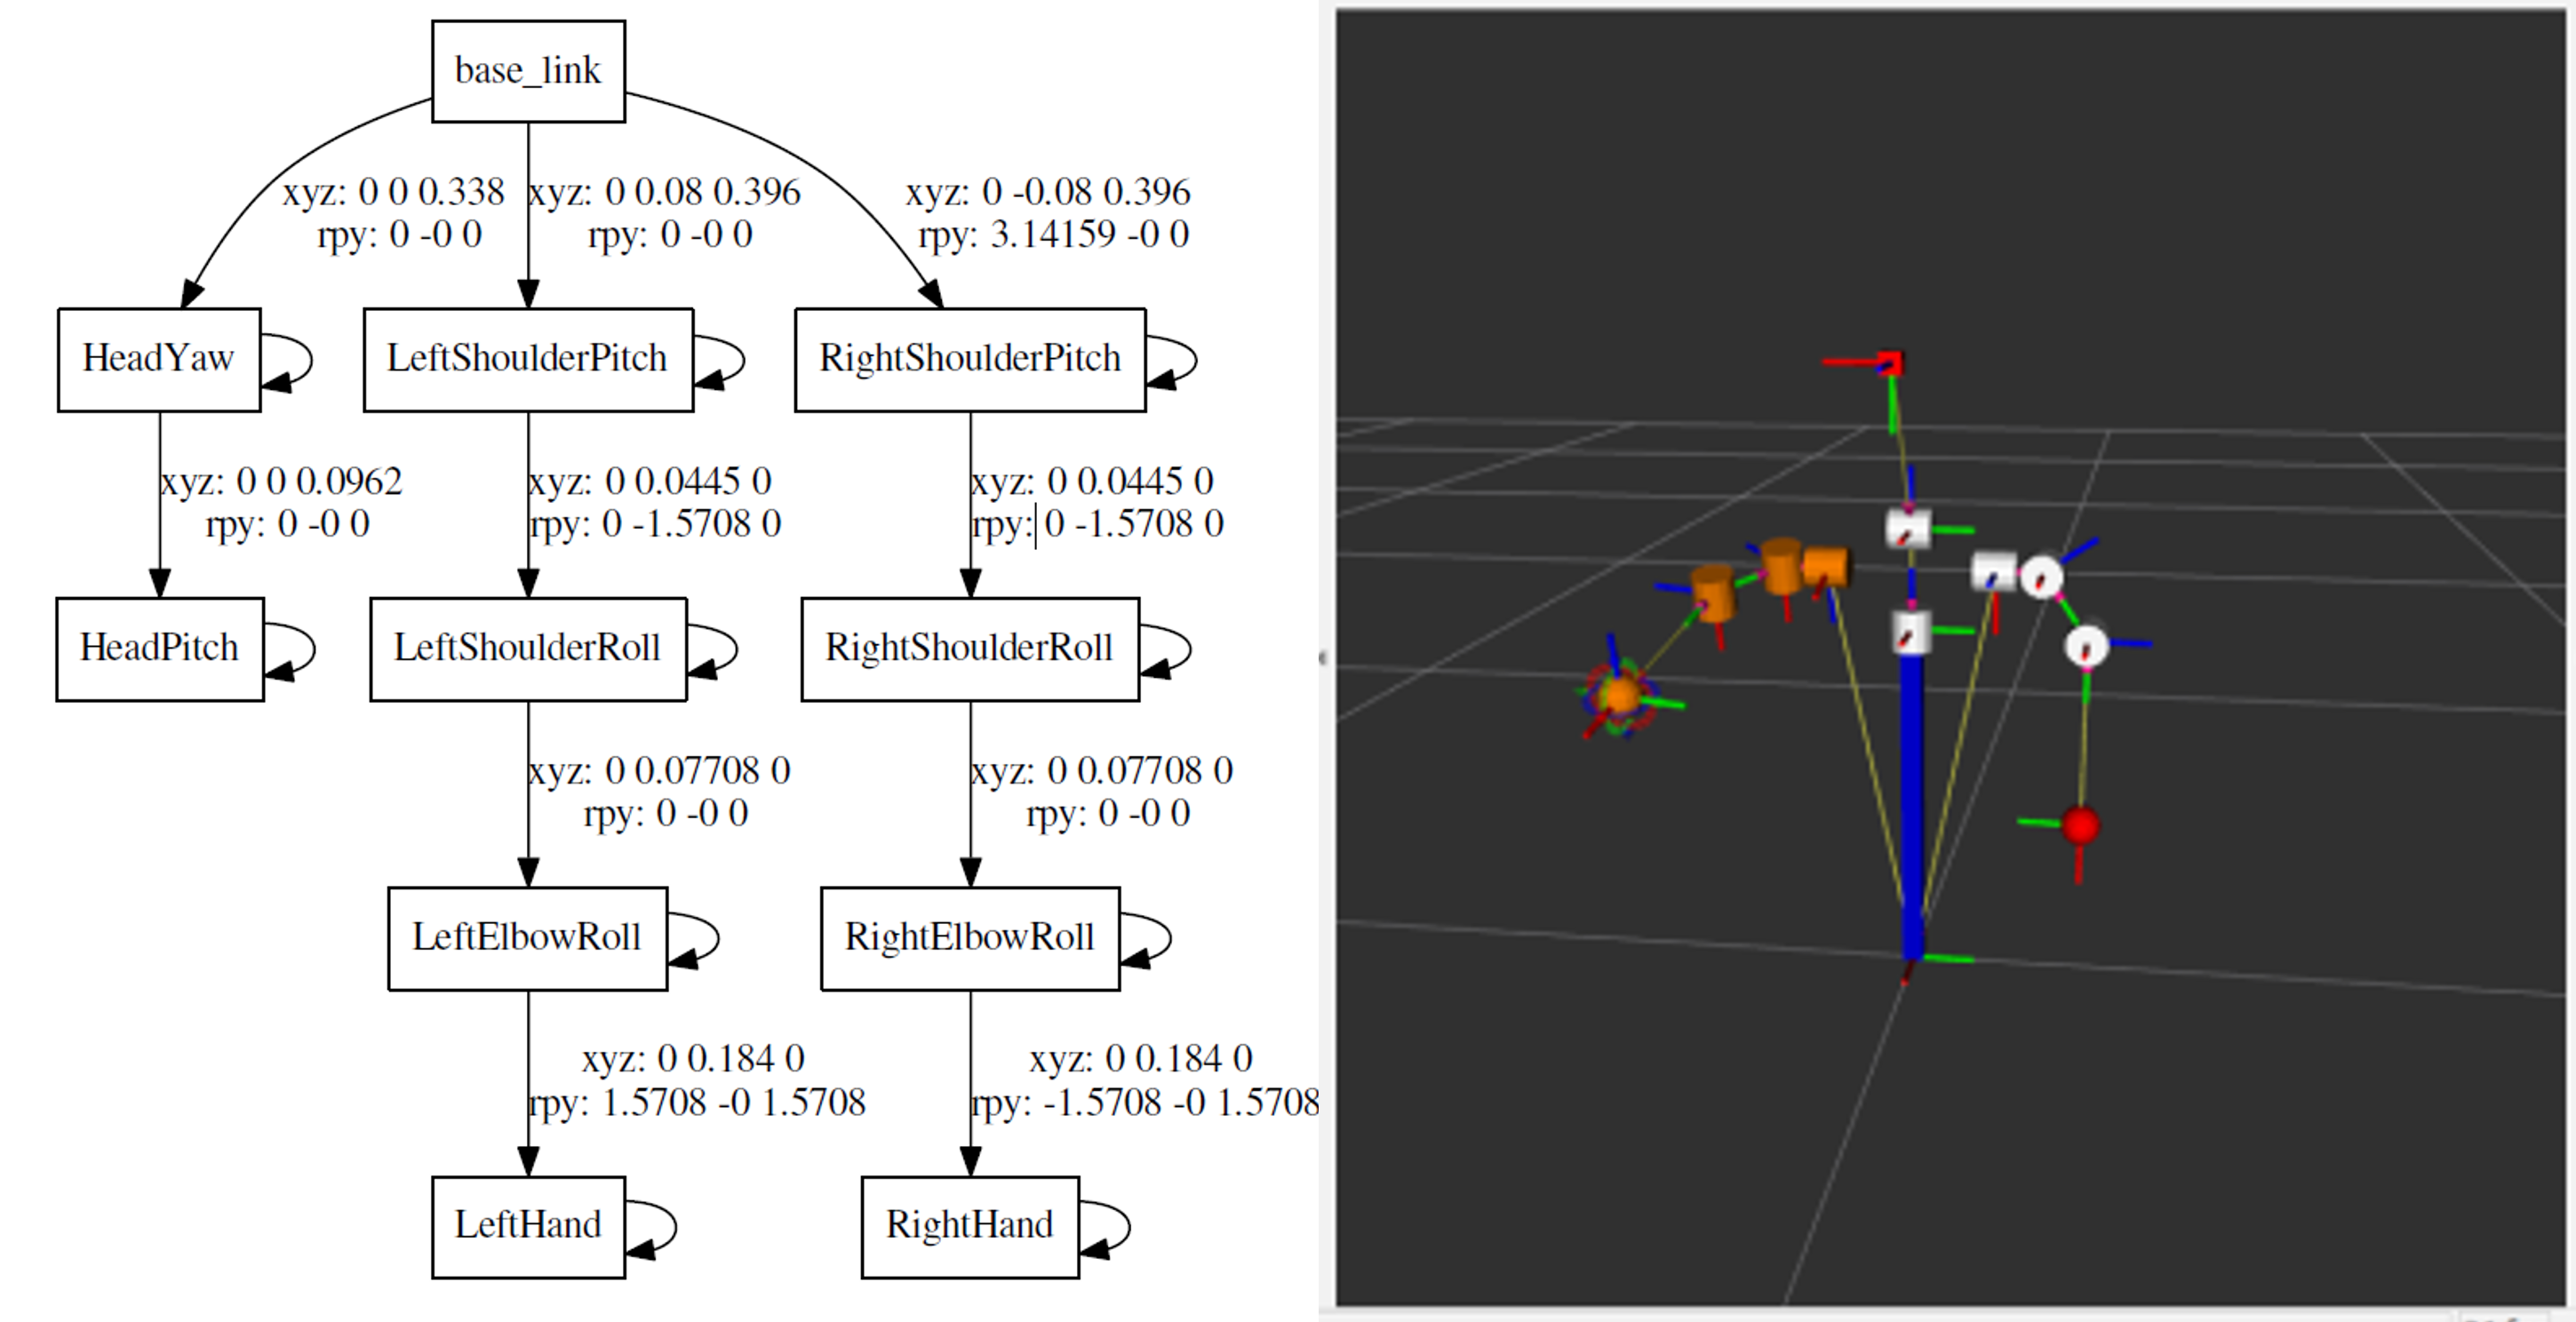
Download the QTrobot URDF files here: qtrobot.pdf and qtrobot_urdf.zip.