QTrobot Audio processing and Microphone
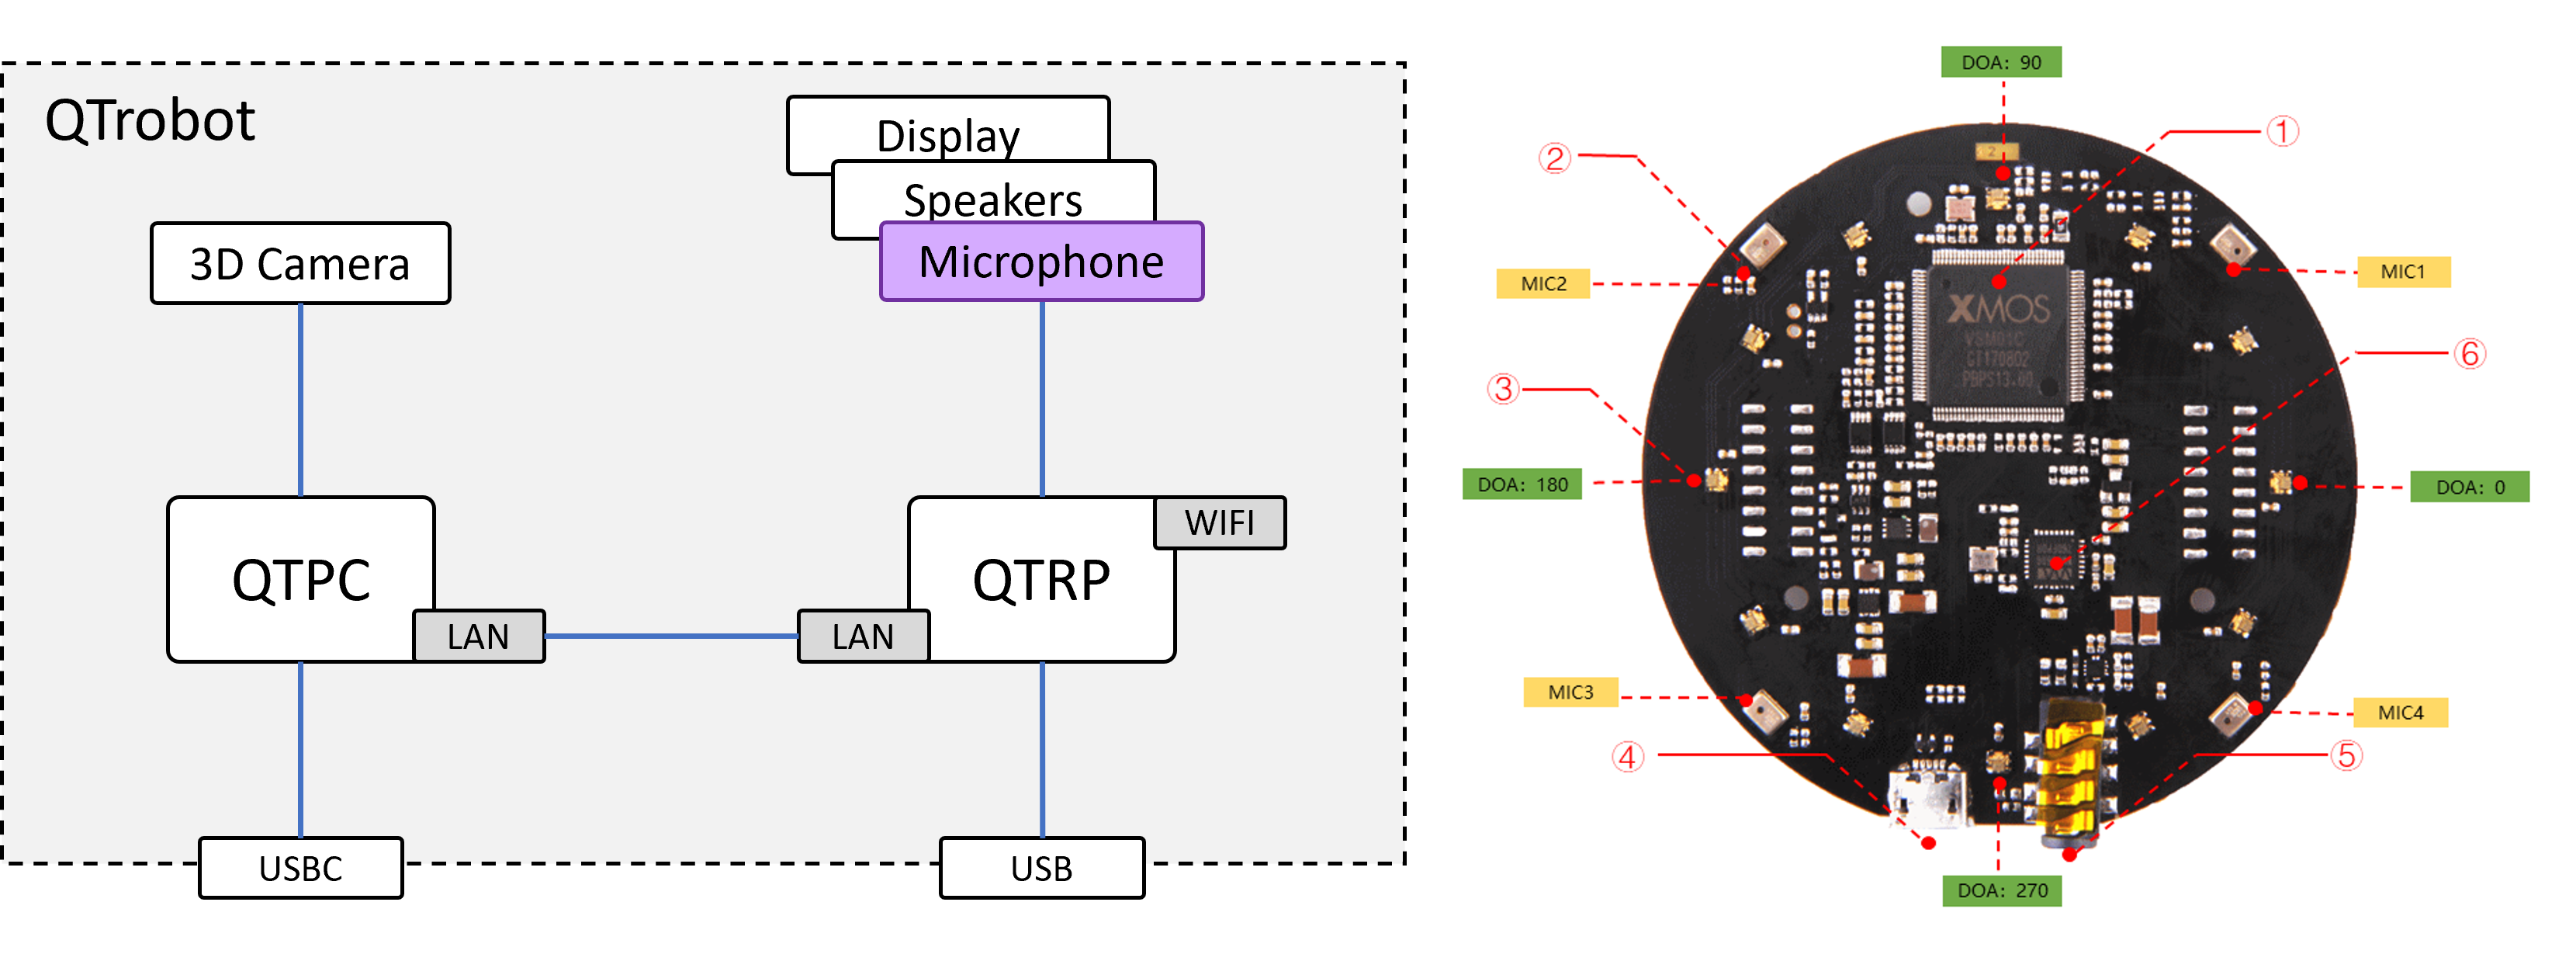
QTrobot has an integrated High-performance digital microphones array in the head. It is a ReSpeaker Mic Array v2.0 board from SeedStudio with plenty of features such as voice activity detection, direction of arrival, beamforming and noise Suppression. This powerful microphone can be used in variety of scenarios such as voice interaction, interactive vision-voice applications, multichannel raw audio recording and processing and etc. It is connected to Raspberry Pi (QTRP) via USB port and it is open for developers to freely tune, configure and use it in standard ways.
Specification:
- 4 High-performance digital microphones
- supports far-field voice capture
- Speech algorithm on-chip
- 12 programmable RGB LED indicators
- Microphones: ST MP34DT01TR-M
- Sensitivity: -26 dBFS (omnidirectional)
- Acoustic overload point: 120 dB SPL
- SNR: 61 dB
- Max Sample Rate:16Khz
Software interfaces
Like any other standard microphones, the QTrobot Respeaker microphone is an standard Linux capture device which is managed by ALSA driver. Bellow you can see the output of arecord -l command which lists all capture devices in QTRP:
**** List of CAPTURE Hardware Devices ****
card 2: ArrayUAC10 [ReSpeaker 4 Mic Array (UAC1.0)], device 0: USB Audio [USB Audio]
  Subdevices: 0/1
  Subdevice #0: subdevice #0
QTrobot comes with following pre-installed software for speech recognition, accessing raw raw microphone data and tuning tool. These software interfaces are installed on QTRP because direct access to the microphone device is required.
- qt_respeaker_app: ROS services for streaming multichannel microphone audio data, voice activity, voice direction and etc. (running by default)
- respeaker_mic_tuning: A graphical tools for detailed tuning of Respeaker microphone
Installed on QTPC:
- qt_vosk_app: an offline and multilingual speech recognition ROS service based on VOSK library. (running by default)
- qt_gspeech_app: an online and multilingual speech recognition ROS service based on Google Speech-To-Text API
Offline speech recognition RIVA (QTrobot AI@Edge)
For offline voice recognition on QTrobot AI@Edge variant, please refer to QTrobot Riva speech recognition tutorial.
Offline speech recognition VOSK (QTrobot RDi5/i7)
QTrobot uses qt_vosk_app for offline speech recognition. The qt_vosk_app is installed in QTPC ~/catkin_ws and it is running by default. Some of the required language models for speech recognitions are installed in ~/robot/vosk/models in QTPC such as en_US for English, de_DE for German, fr_FR for French languages.
You can try and use the speech recognitions in different ways.
Accessing voice recognition from terminal
Like many other ROS services, you can call /qt_robot/speech/recognize with the desired language and options. The options can be used to tell the service to stop and return the recognized words as soon one of the given options is detected.
$ rosservice call /qt_robot/speech/recognize "language: 'en_US'
options:[]
timeout: 0"
Accessing voice recognition from code
Take a look at our Python Vosk speech recognition tutorial to learn how to call qt_vosk_app services from a Python code.
For QTrobotAI@Edge version please check Python Riva speech recognition tutorial.
Here is also a Python code snippet:
from qt_vosk_app.srv import *
recognize = rospy.ServiceProxy('/qt_robot/speech/recognize', speech_recognize)
resp = recognize("en_US", ['blue', 'green', 'red'], 10)
print("I got: %s", resp.transcript)
Accessing voice recognition using QTrobot visual studio blocks
QTrobot studio offers very flexible and powerful blocks to handle complex ROS messages and interact with other publishers, subscribers and services. You can follow Using ROS blocks tutorial to learn how to call qt_vosk_app using QTrobot visual studio blocks.
Installing more languages
If your required language is not already installed on the robot, you can go through the following steps to add it to the qt_vosk_app:
- find the proper model of your desired language from https://alphacephei.com/vosk/models list.
- Download and unzip the model into
~/robot/vosk/modelsQTPC folder. - Rename the model folder to the short language code (ISO) such as
it_ITfor Italian. - relaunch
qt_vosk_appor simply reboot the QTrobot.
Online speech recognition
Always check if you have the latest code of the 'qt_gspeech_app' on your QTPC. You can check with 'git status' command in the '~/robot/code/software' folder.
Latest update (10. May 2023):
- Enabled Automatic punctuation
- Default Timeout of 5 min: call the service with timeout=0 to enable it
- BUG FIX: Sometimes Google speech recognition would return empty response when providing timeout in rosservice call, use default timeout instead
The qt_gspeech_app
provides an online (required INTERNET connection) multilingual speech recognition ROS service based on Google Speech-To-Text API. The qt_gspeech_app is not running by default and it cannot be run simultaneously with other voice apps such as qt_vosk_app. To disable the qt_vosk_app, you can simply comment the corresponding line in ~/robot/autostart/autostart_screens.sh on QTPC and reboot the robot.
Setup instructions
Google account and API credentials
Please follow the setup instructions to setup your google account before enabling the qt_gspeech_app.
Export your google api credentials in .json file and save it on the QTPC.
Edit and add to the last line in ~/.bash_aliases file:
export GOOGLE_APPLICATION_CREDENTIALS=<path-to-your-file>
example:"/home/qtrobot/credentials.json"
Python virtualenvironment
We recommend you use python virtual environments to install all python modules and setup the google speech recognition.
- Install python virtual environment:
sudo apt install python3.8-venv - Navigate to 'qt_gspeech_app' folder:
cd ~/robot/code/software/apps/qt_gspeech_app - Setup virtual environment:
python3 -m venv .venv - To use is you just need to activate it:
source .venv/bin/activate - install all python modules and plugins inside this virtual environment.
Link to catkin workspace and build
To be able to use rosservice you need to link the code to the catkin workspace and build it:
- navigate to catkin workspace:
cd ~/catkin_ws/src
- link the qt_gspeech_app:
ln -s /home/qtrobot/robot/code/software/apps/qt_gspeech_app .
- rebuild catkin workspace:
cd ~/catkin_ws && caktin_make -j4
Autostart
To enable it in autostart script (~/robot/autostart/autostart_screens.sh) on QTPC follow next steps:
- edit autostart_screen.sh
nano ~/robot/autostart/autostart_screens.sh
and add this line below other scripts:
run_script "start_qt_gspeech_app.sh"
- create "start_qt_gspeech_app.sh"
add and edit the following content:
nano ~/robot/autostart/start_qt_gspeech_app.sh# !/bin/bash
source /home/qtrobot/robot/autostart/qt_robot.inc
SCRIPT_NAME="start_qt_gspeech_app"
LOG_FILE=$(prepare_logfile "$SCRIPT_NAME")
{
prepare_ros_environment
wait_for_ros_node "/rosout" 60
source /home/qtrobot/catkin_ws/src/qt_gspeech_app/.venv/bin/activate;
python /home/qtrobot/catkin_ws/src/qt_gspeech_app/src/qt_gspeech_app_node.py;
} &>> ${LOG_FILE} - save the file and reboot the QTrobot
Accessing voice recognition from terminal
Similar to the offline version of speech recognition, the interface can be accessed using ROS Service /qt_robot/speech/recognize command line tools as shown bellow:
rosservice call /qt_robot/speech/recognize "language: 'en_US'
options:
- ''
timeout: 10"
You can refer to the instruction given above for the offline version of the voice recognition to use the qt_gspeech_app service in a Python code or using QTrobot visual studio blocks.
If you would like to use qt_vosk_app and qt_gspeech_app at the same time, then you will need to change rosservice that they are providing. By default both of them are using "qt_robot/speech/recognize".
To change the rosservice for qt_gspeech_app follow the next steps on QTPC:
- cd ~/robot/code/software/apps/qt_gspeech_app/src
- edit qt_gspeech_app_node.py line 67:
self.speech_recognize = rospy.Service('/qt_robot/speech/recognize', speech_recognize, self.callback_recognize)
Change 'qt_robot/speech/recognize' to 'qt_robot/gspeech/recognize' 3. save the file 4. next time you run 'qt_gspeech_app' it will be available on 'qt_robot/gspeech/recognize' rosservice
Tips for better speech recognition
The microphone is installed on top of the QTrobot's head. Therefore, it is always better to talk to QTrobot from above (higher than robot) the robot so that your voice can clearly reaches the microphone.
yes or no in a sentence, give these values as options so that the service immediately return one of these two values as soon being detected by engine.
qt_vosk_app, there might be delay from the moment you switch the language at run-time until the engine loads the model and start analyzing the voice. This is related ONLY to the first call for switching the language.
Accessing audio, voice direction and other data
The qt_respeaker_app provide ROS services for streaming multichannel microphone audio data, voice activity, voice direction and etc. Here is a list of the topics which are published by qt_respeaker_app:
-
/qt_respeaker_app/channel0: processed audio for ASR (mix of 4 microphones data) -
/qt_respeaker_app/channel1: mic1 raw data -
/qt_respeaker_app/channel2: mic2 raw data -
/qt_respeaker_app/channel3: mic3 raw data -
/qt_respeaker_app/channel4: mic4 raw data -
/qt_respeaker_app/channel5: merged playback -
/qt_respeaker_app/is_speaking: VAD (Voice Activity Detection) -
/qt_respeaker_app/sound_direction: DOA (Direction of Arrival)
When using VOD values, please not that 270 indicates to the front of QTrobot due to the microphone orientation in the robot's head.
Configuring qt_respeaker_app
The qt_respeaker_app is already installed in the ~/catkin_ws folder on QTRP. There is a config file qt_respeaker_app.yaml in the app folder which can be used to configure the Respeaker microphone especially with tuning parameters. Here are some of the default tuning parameters:
qt_respeaker_app:
  suppress_pyaudio_error: true
  update_rate: 10.0
  tuning:
    AGCGAIN: 50.0
    AGCONOFF: 0
    CNIONOFF: 0
    GAMMA_NS_SR: 1.8
    MIN_NS_SR: 0.01
    STATNOISEONOFF_SR: 1
For most of the cases the default parameters should just work fine for you. However, you may need to adjust some of these values such as AGCGAIN to have loader (more gain) in streamed audio or MIN_NS_SR and GAMMA_NS_SR to better eliminate background noises such as QTrobot internal fan's noise.
Recording raw audio data
The qt_respeaker_app streams each microphone channel's data in seperate topics: /qt_respeaker_app/channel0 - 5. To record any or multiple of these channels, you can simply subscribes to the correspondig channels from QTPC (or any other computer in ROS network) and store the audio data in a WAV file or other audio formats. You can take a looke at audio_record.py examples to see how to record /qt_respeaker_app/channel0 in a .wav file. Here is also a simple code snippet:
import wave
from audio_common_msgs.msg import AudioData

def channel_callback(msg, wf):
    wf.writeframes(msg.data)

wf = wave.open("audio.wav", 'wb')
wf.setnchannels(1)
wf.setsampwidth(2)
wf.setframerate(16000)
rospy.Subscriber('/qt_respeaker_app/channel0', AudioData, channel_callback, wf)
...
wf.close()
The above code snippet records processed audio for ASR from channel 0 and save it in audio.wav file. You can later process or listen to it.
By default some tuning parameters for noise reduction and automatic gain level are set in config/qt_respeaker_app.yaml. If, for example, you need to record audio with different gain level, you can simply change the AGCGAIN: 100.0 and reluach the qt_respeaker_app.
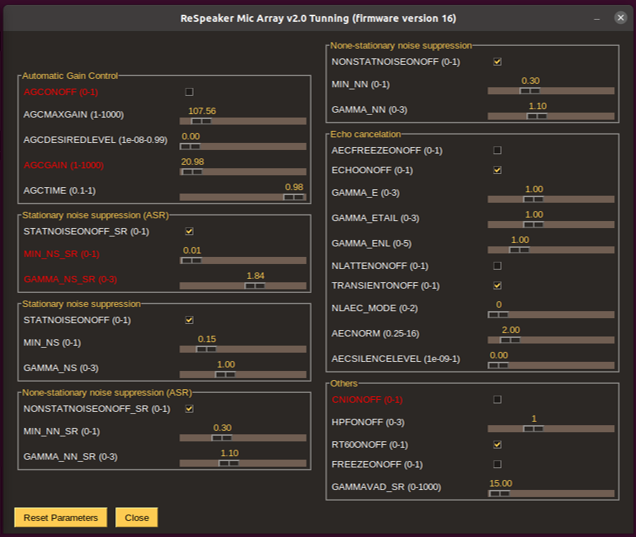
Microphone tuning tool
We have developed respeaker_mic_tuning graphical tools based on ReSpeaker USB 4 Mic Array tuning software to easier find and tune the Respeaker microphone parameters. Using the gui, you can tune the parameters at runtime and find the one that value which best fits your scenario such as different audio gain level or different background noise elimination.
The tool is available in QTRP under ~/robot/code/software/tools/ folder. To run it:
- Open a terminal on QTPC (with display attached to the robot)
- SSH to QTRP using
-Xparamter:ssh -X qtrp - switch to the
~/robot/code/software/tools/respeaker_mic_tunningfolder - run the tuning tool:
python3 ./tunning_gui.py
What can I tune?
You can find the best value and tune each Respeaker parameter depending on your need. You may need to learn and got some knowledge of audio signal processing to understand all these parameters. However, in most cases you simply need to adjust the following paramters of the Respeaker microphone:
AGCONOFF: to turn of or on automatic gain control. When it is 'OFF', the audio will be captured with a constant gain set byAGCGAIN.AGCGAIN: the sudio signal gain value. Higher value will results loader (higher volume) audio streamed signal.GAMMA_NS_SRandMIN_NS_SR: these two values together specify how much background noise should be eleminated. these values already set up in QTrobot to supress and eliminate the background noise from internal fan. You can adjust these values to have more clear audio signal.
What can I do with the tunned values?
The respeaker_mic_tuning temporary adjusts the paramters of Respeaker microphone. However, values of these paramters will be reseted after rebooting the robot.
therefore, when you find the currect values which fits your application scenario, you can use those values to confgiure the corresponding QTrobot interfaces.
For example, by setting them in qt_respeaker_app.yaml for qt_respeaker_app or use them to configure within your own code. here is simple code snippet to set Respeaker's paramters via a Python code:
import usb.core
from tuning import Tuning

mic = usb.core.find(idVendor=0x2886, idProduct=0x0018)
dev = Tuning(mic)

dev.write("AGCONOFF", 0)
dev.write("AGCGAIN", 100.0)
...
You can take a look at our qt_vosk_app_node.py as a reference code.
How to use an external microphone with QTrobot?
You can add a USB microphone alongside QTrobot’s built-in ReSpeaker. The external mic will be captured and published as an extra ROS topic; it does not replace the internal mic array.
1) Plug in the USB microphone
- Use the USB port on the QTRP (Raspberry Pi) at the back of the QTrobot.
2) SSH into QTRP and list capture devices
ssh developer@qtrp
su qtrobot

arecord -l
# Example output (truncated):
**** List of CAPTURE Hardware Devices ****
card 2: ArrayUAC10 [ReSpeaker 4 Mic Array (UAC1.0)], device 0: USB Audio [USB Audio]
card 3: Mic [Samson Meteorite Mic], device 0: USB Audio [USB Audio]
Use the device name shown by arecord -l (e.g., Samson Meteorite Mic).
3) Configure QTrobot to use the external mic
Edit /home/qtrobot/robot/code/software/apps/qt_respeaker_app/config/qt_respeaker_app.yaml and Set external_mic.enable to true and set external_mic.device_name to the exact name (quotes recommended if it contains spaces):
qt_respeaker_app:
  # … keep your existing settings …

  external_mic:
    enable: true
    device_name: "Samson Meteorite Mic"   # exact name from `arecord -l`
    enfrorce_16k: true                    # resample to 16 kHz if needed (recommended for most ASR)
4) Restart the qt_respeaker_app (or alternatively reboot the QTrobot):
sudo systemctl restart qt_respeaker_app.service
Resulting ROS topics
- External mic stream:
/qt_respeaker_app/external1 - Internal ReSpeaker channels:
/qt_respeaker_app/channel0, /qt_respeaker_app/channel1, …
If you want your app to use the external mic stream, subscribe to /qt_respeaker_app/external1 instead of the internal mic topic (e.g. /qt_respeaker_app/channel0).
For example, the QTrobot: Your AI Data Assistant demo subscribes to /qt_respeaker_app/channel0 by default. change the ROS topic in riva_speech_recognition_vad.py to /qt_respeaker_app/external1: