QTrobot Computation and networking
QTrobot comes with two computers: i) QTRP, a Raspberry Pi based computer to control the main hardware and ii) QTPC, which can be an Intel® NUC i5/i7 PC or Nvidia Jetson AGX Orin, to provide more computational power and to accelerate software development cycle. Both computers run on Ubuntu/Debian Linux operating systems and leverage ROS to offer easy-to-use yet very flexible software architecture. QTrobot's hardware is easily extendable via USB-C and USB adaptors, for example, to connect external monitor, keyboard and mouse and sensors.
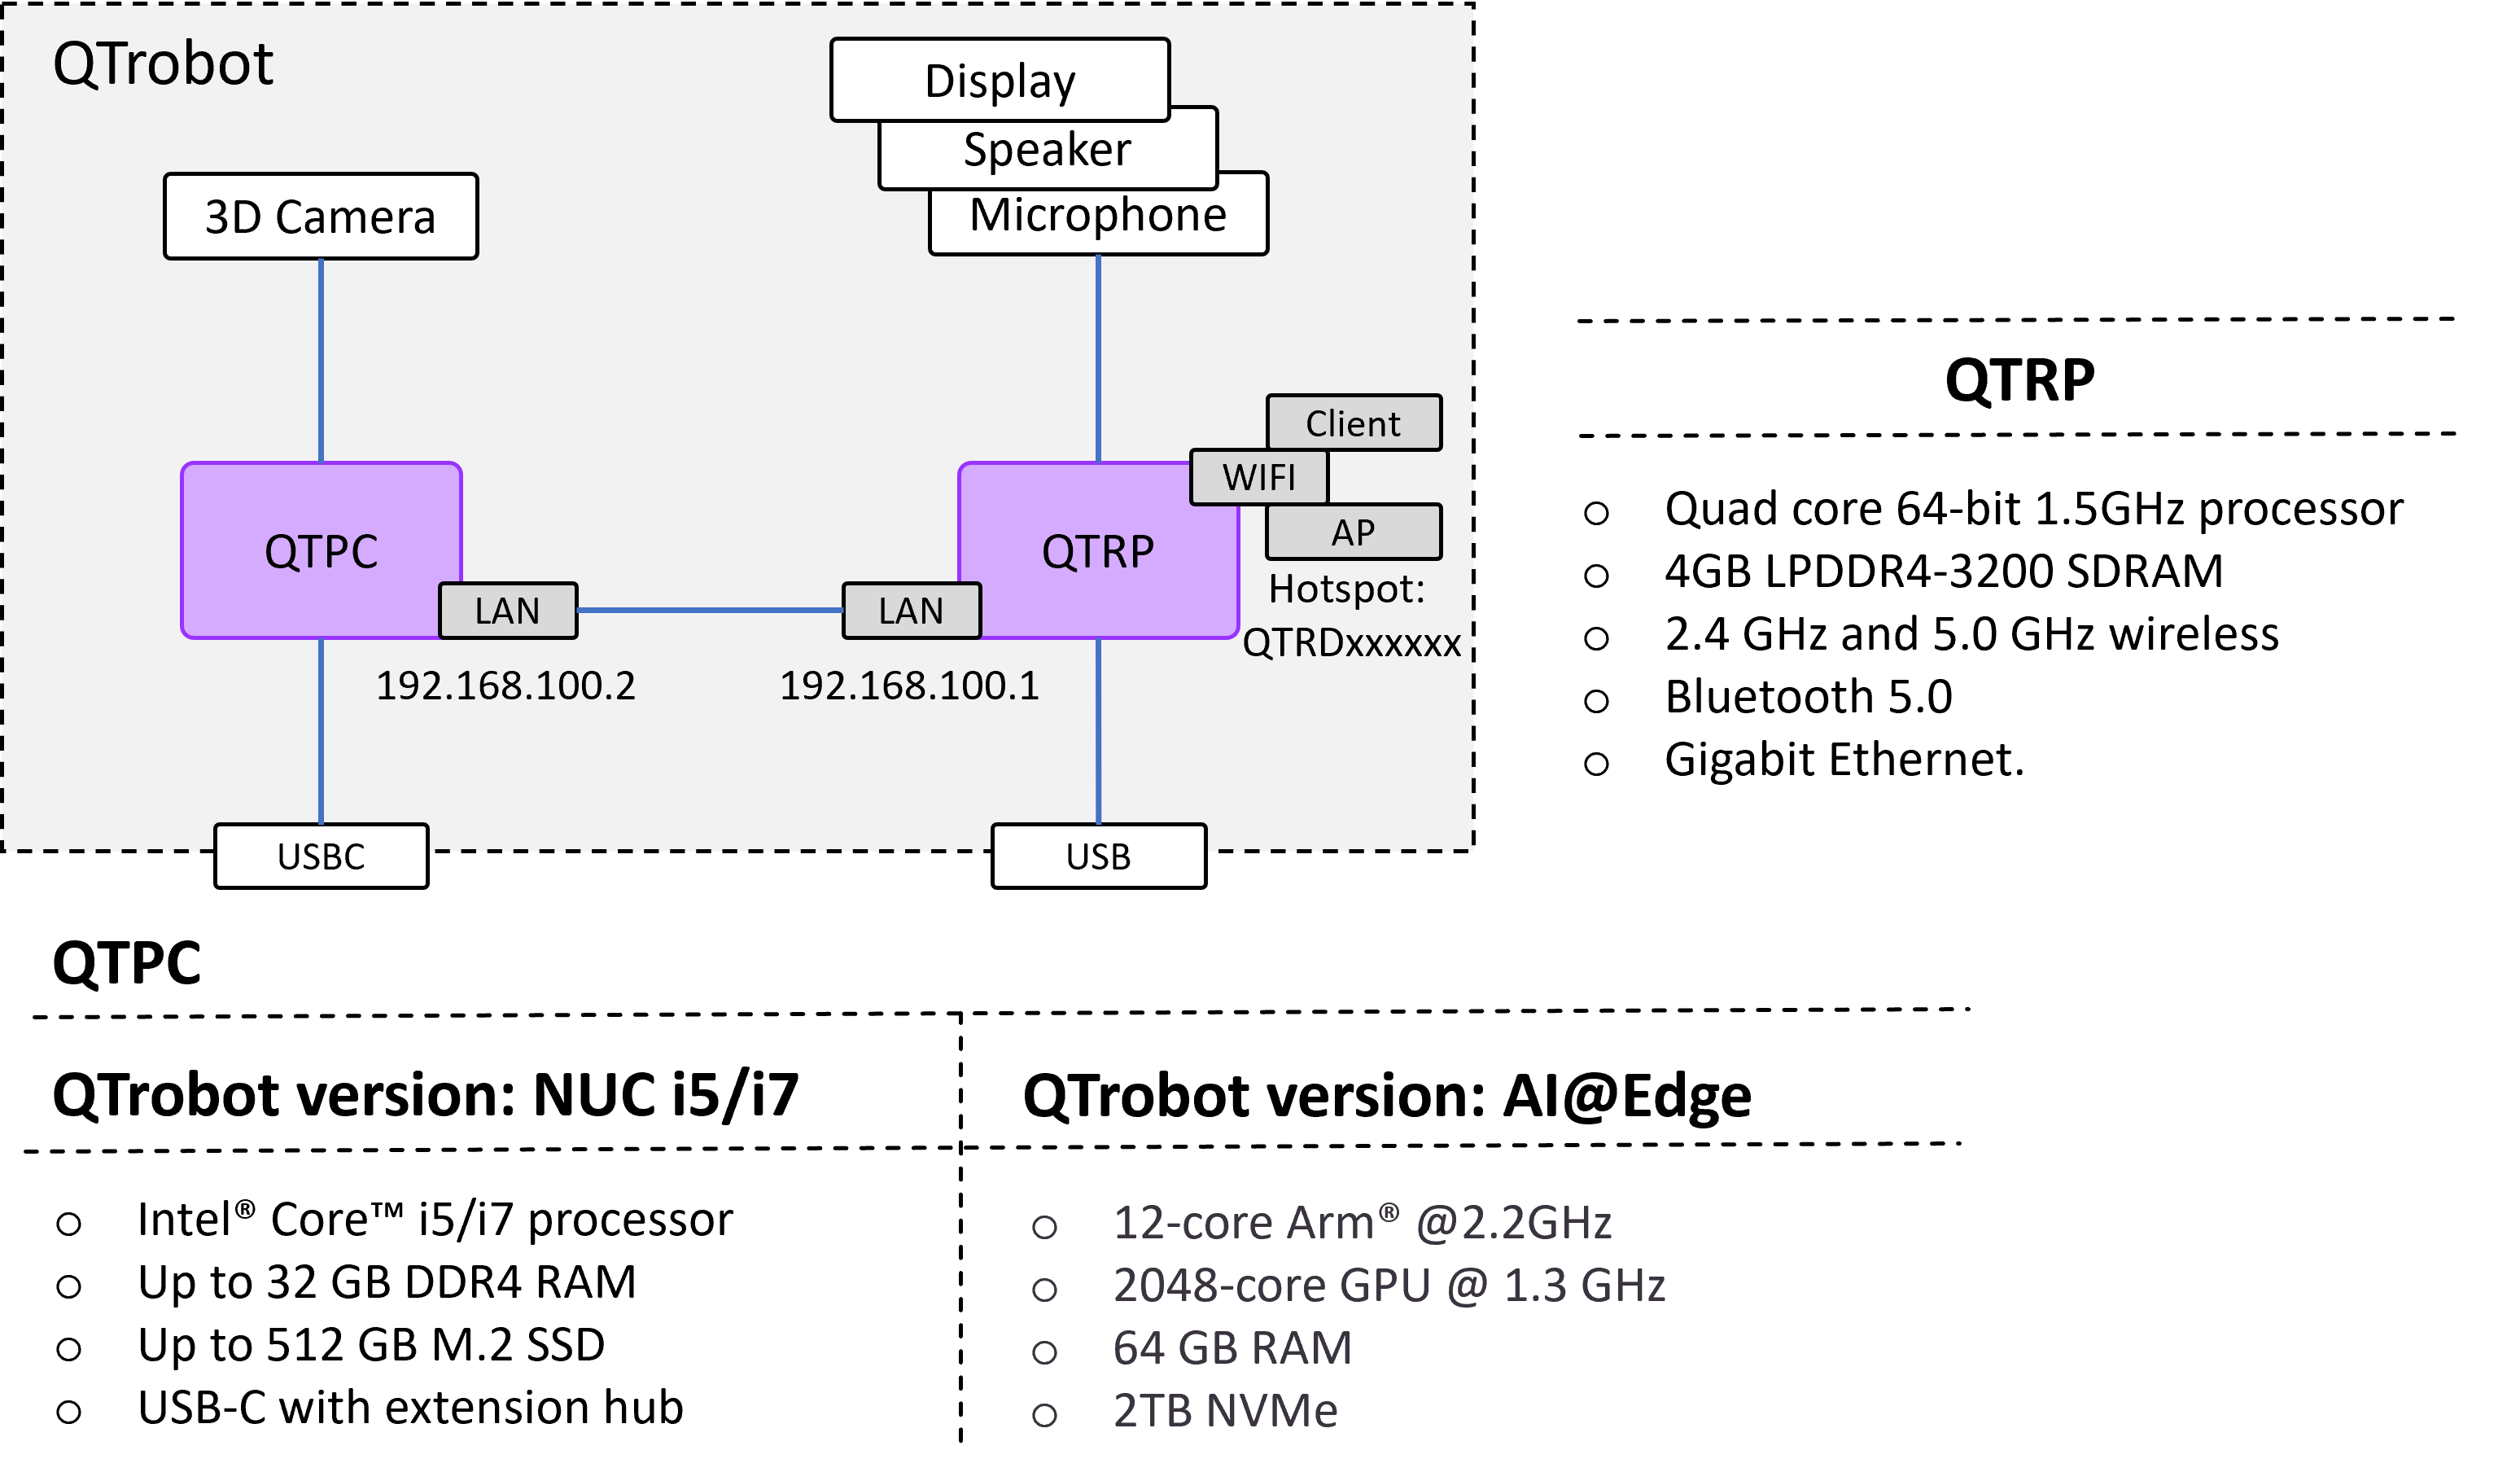
As it is shown in the above diagram, QTRP (in QTrobot's head) is internally connected to QTPC (in QTrobot's body) via ethernet cable. All of the QTrobot devices such as display, speakers, microphone and motors are connected to QTRP except the 3D Camera which is connected directly to QTPC. The Wi-Fi of the QTRP is used to create the QTrobot hotspot with the same SSID as the robot’s serial number (e.g. QTRD000101).
Operating systems
The older versions of QTrobot came with Ubuntu 16. However, we have updated the operating system of both integrated QTrobot’s computers to the latest stable version of Linux. The QTPC comes with Ubuntu 20.04 LTS and the Raspberry Pi board (QTRP) at the head uses the latest version of Raspberry Pi OS (Debian Buster). Both computers are updated to latest stable version of ROS Noetic with Python 3 as default. The latest is particularly interesting because its opens accessing wider list of open-source software and libraries which use Python 3 such as recent machine and deep learning libraries, voice processing and recognition software.
Networking
The following diagrams show two configurations of QTrobot's network: i) QTrobot is offline and its WiFi is configured as hotspot (default configuration) and ii) QTrobot is connected to the home/office network via its WiFi. By connecting the WiFi of QTRP to the home/office router with the internet, Nuc PC (QTPC) also gets access to the internet. Moreover, laptops and other devices which are in the same network as the home router, can be easily configured to access and control QTrobot via ROS.

There are three system services on QTRP which manage the network setup of QTrobot:
- qt_wlan0_ap: setup the QTrobot in hotspot mode when it is running.
- qt_wlan0_client: connects the QTrobot to a home/office router when it is configured and running.
- qt_wifi_manager: monitors the consistency of QTrobot WiFi setups at boot time and automatically enables the robot's hotspot if there is any issue with internet router connectivity.
- The qt_wlan0_ap and qt_wlan0_client services are mutually exclusive. That means that both of them cannot be enabled and run simultaneously.
- Please do not modify or disable the qt_wifi_manager service. This may break the network setup of your QTrobot!
How to connect QTrobot to the internet
Please follow Connect QTrobot to a home network and Internet instruction.
How to enable QTrobot's hotspot
QTrobot's hotspot is enabled by default. However, if you have connected your robot to the internet and would like to disconnect and enable the hotspot, you can simply follow this instruction:
1. From the Ubuntu desktop of QTPC, open a terminal and access QTRP via ssh:
ssh developer@QTRP
# password: qtrobot
2. Enable the qt_wlan0_ap service and disable the qt_wlan0_client service:
sudo systemctl disable qt_wlan0_client.service
sudo systemctl enable qt_wlan0_ap.service
3. Restart the robot
ROS setup
The roscore runs on QTRP automatically at QTrobot boot time. The QTPC is setup with the correct ROS_MASTER_URI and ROS_IP to access the same ROS network as QTRP. ROS master URI is set to http://<your robot serial>:11311 (for example http://QTRD000100:11311). However, you can easily check it by looking into /etc/luxai/ros/env.sh file on QTRP:
cat /etc/luxai/ros/env.sh

# ...
# export ROS_HOSTNAME=$(hostname).local
# export ROS_MASTER_URI=http://$ROS_HOSTNAME:11311
Catkin workspace
For both QTRP and QTPC, the Catkin workspace is already set up and is accessible under /home/qtrobot/catkin_ws folder. The workspaces also contains some important ROS nodes for QTrobot interfaces such as qt_nuitrack_app, qt_vosk_app and etc. Indeed you can use the same catkin workspace for your own developments but be careful to not remove the src folder within catkin workspace.
- You do not need and should not run another instance of
roscoreneither on QTPC nor QTRP nor any other machine which are in the ROS network of QTrobot. - Do not delete the default
catkin_wsfolders on QTRP nor on QTPC. These folder already used for running some default QTrobot interface nodes such asqt_nuitrack_appon QTPC orqt_vosk_appon QTRP.
QTrobot startup process
The following diagram depicts the default process of QTrobot's startup. Upon turning on the robot (either by plugin the power line or by pressing the power button), the QTRP will boot and set up the network for Lan, Wi-Fi hotspot and connecting to the home/office router (if set up). Then it runs the roscore and launch the QTrobot interfaces such as qt_motor, qt_robot_interface and etc. When the basic interfaces is up and running, it then turn on QTPC via wake-on-lan. QTPC then boot up and start the qt_nuitrack_app interface.
Powering off QTrobot almost follows the reverse procedure of powering on. The QTrobot's power button is connected to Raspberry PI and trigs the power off procedure of QTRP. During the shut down process of QTRP, it also sends power off command to QTPC via SSH so that both computers turn off using a single power button. Below is an overview of the power-off process of QTrobot.
What are autostart scripts?
QTrobot uses some startup scripts (i.e. autostart scripts) for both QTPC and QTRP to start and launch its software and drivers at boot time. Autostart scripts are simply some bash scripts which are executed at QTrobot startup time. There are different set of autostart scripts, one for QTRP and the other set for QTPC. Generally, these scripts launch specific ROS nodes on each machine. For example, as it can be inferred from QTrobot Architecture, one of the autostart scripts of QTPC is responsible to launch the qt_nuitrack_app node which provide ROS interface for Nuitrack skeleton tracking using 3D camera. Therefore, it is very important that you completely understand the purpose of each script before disabling or modifying the QTrobot autostart behavior.
The autostart scripts are located in /home/qtrobot/autostart folder under qtrobot user. The autostart_screens.sh script is executed automatically at boot time. The other scripts are launched by autostart_screens.sh and their output are redirected to the corresponding log files.
QTPC autostart scripts
The autostart_screens.sh script on QTPC is responsible for launching the qt_nuitrack_app interface and users custom scripts. Here is the list and short descriptions of each autostart script on QTPC:
- start_qt_nuitrack_app.sh : launch qt_nuitrack_app node (for skeleton tracking, facial feature, gesture recognition and etc.)
How to check the log files of autostart scripts
All programs/ROS nodes which are run by QTrobot autostart scripts redirect their standard output (info/war/error messages) to their corresponding log file. These log files can be found under /home/qtrobot/autostart/logs folder.
How to run my own script at startup on QTPC
For example, to run your custom script on QTPC at the startup, you need to first create a startup script file and call it from autostart_screens.sh. Do the following steps:
-
[Step 1] Create custom startup script
open a terminal on QTPC and create a bash script file. Let's name it
start_my_script.sh.nano /home/qtrobot/autostart/start_my_script.shwith the following example content:
# !/bin/bash
source /home/qtrobot/robot/autostart/qt_robot.inc

SCRIPT_NAME="start_my_script"
LOG_FILE=$(prepare_logfile "$SCRIPT_NAME")

{
prepare_ros_environment
wait_for_ros_node "/rosout" 60
# ...
# add your main code here
/usr/bin/echo "This is my script!"
# ...
} &>> ${LOG_FILE} -
[Step 2] Add it to
autostart_screens.shCarefully edit the
autostart_screens.sh:nano /home/qtrobot/autostart/autostart_screens.shTo add your own script (e.g.
start_my_script.sh) you can simply add the following line to the buttom ofautostart_screens.shright before the} &>> ${LOG_FILE}line. Theautostart_screens.shshould look like the following:{
wait_for_network
...
...
run_script "start_my_script.sh"
} &>> ${LOG_FILE} -
[Step 3] Reboot and check Reboot the QTrobot. After reboot, your script should be executed on startup of QTPC. You can now check the log file of your script:
cat /home/qtrobot/austostart/logs/start_my_script.log