Quick start with Visual scripting
This document guides you towards quick start with Visual scripting (Graphical programming) using the QTrobot Visual Studio. If you are looking for coding such as python programming , please take a look at Quick start with coding on QTrobot.
1. What is QTrobot visual studio?
QTrobot Studio is a tool to empower non-technical users to create advanced robot programs. It is an easy-to-use graphical interface designed for non-technical users such as researchers in the field of psychology, education, and human science who are interested to create their own tailormade research use case. By using simple, easy-to-understand blocks, non-technical researchers are able to create a fully functional program that can be used with the intervention group in just a few clicks.
What can I build using visual studio?
QTrobot Studio allows non-technical researchers to create programs for:
- Robot speech in various languages
- Showing facial expressions & emotions on QTrobot face
- Showing various gestures from the pre-recorded gesture gallery and recording new custom gestures
- Manually controlled, Wizard of Oz conversation & response choices
- Presenting visuals such as images and videos on a tablet screen and creating interactive tablet applications with clickable visuals
- Interactive programs using facial expression recognition, gesture recognition and image recognition
- Autonomous conversation using pre-defined responses
- Generating automated session reports and progress evaluation from the interaction with the robot
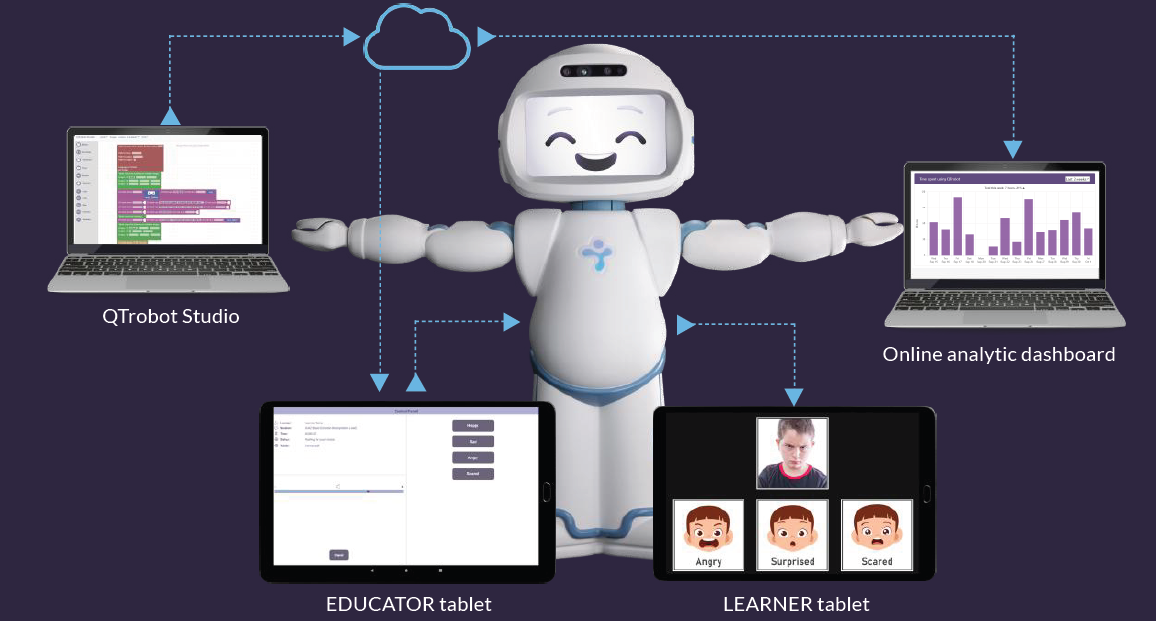
How does it work?
Users can develop applications either using LuxAI QTrobot Studio online platform or directly using Educator Android App (offline). The online platform, however provides more convenient way and further functionalities to develop applications. We recommend you to program QTrobot using QTrobot Studio platform, validate and save it in your own account. Then you can sync the Educator App with the cloud platform to access and run your program on QTrobot (which also works offline). If necessary, you can debug and edit the program using Educator App and sync it back with your online account. Here are the overall procedure of application development for QTrobot using Visual studio:
- Access online studio on qtrobot.luxai.com to create your program using easy to use visual blocks, upload custom images, animations, and audios
- Use the EDUCATOR tablet to run your programs on QTrobot and control the robot during the interaction with the research participants
- Use LEARNER tablet to show your custom interactive clickable visuals to the research participant
- Collect the results and create analytic reports
2. Prepare your setup
Let's first see how to setup your QTrobot and start with tablets.
Step 1. Turn on QTrobot
- Put your robot safely on a stable surface (e.g in a center of table). We strongly recommend to attach the QTrobot to use the QTrobot with its attachment base as shown in the above figure. If you have not done yet, you can refer to this simple assembly instruction manual to attach the base to your QTrobot.
- Attach its Power supply1. It will automatically turn on when you attach the power supply. If the power supply was already attached, you can simply press once the power button at the back of the robot to turn it on.
- Wait for the robot to be fully up. it will take a minute for the robot to be on and ready. You should see the robot head moves up and it shown it neutral face.
Do not press and hold the power button. It it is enough that you press it once to turn the robot on!
Step 2. Connects both tablets to QTrobot
The quickest way to get the tablets works with the robot is to connect their WiFi to the WiFi of QTrobot.
- Turn on both tablets (Educator and Learner)
- Go to the Android WiFi setting and connect the tablet's WiFI to your QTrobot WiFi. If your robot is On, you should see it's WiFi name similar to
QTRD000100. - Run both LuxAI Educator and Learner app from their corresponding tablets and follow the instruction to connect to the QTrobot. For most the cases, your tablet should be already preconfigured to connect to the QTrobot's WiFi automatically.
Step 3. Try some Gestures and Emotions
From the Educator app, go to the main side menu (slide to the right), select Faces and from QT category, click on an emotion. You should see that emotion being played on the QTrobot's face. In the same way, you can try some Gestures to play by QTrobot.
To power off the QTrobot simply press the power button on the back of the QTrobot. Wait enough for QTrobot to turn off before unplugging it from power supply: a blue screen shows up and immediately goes off.
3. Connect QTrobot to a home network and Internet
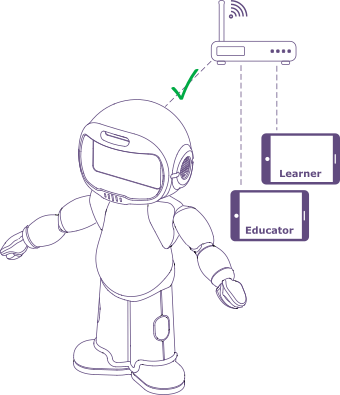
Some recent models of QTrobot's (both Research and Therapy versions) can be connected to your home/office router and access the internet using Educator app. Connecting your QTrobot to the internet is optional but it has few important benefits:
Both your tablets (Educator and Learner) will also have internet while connected to the QTrobot's WiFi. As you will see later during some tutorials, you do not need to switch between QTrobot WiFi and your home router WiFi when synching the tablets with your cloud account.As it shown in the picture below, you can alternatively connects both your tablets to your home/office router and at the same time works with QTrobot using tablets. In this case, if QTrobot in on, the Educator and Learner apps can automatically find your robot in your network without the need of connecting the tablets to the QTrobot's WiFi.
Step 1. Connect the Educator tablet to QTrobot WiFi
- Connect the educator tablet to your QTrobot WiFi (e.g. QTRD0001000)
- Open the Educator App, wait for it to connect to QTrobot
Step 2. Connect QTrobot to your home WiFi
- In the Educator app, from the side menu select the Setting
- Press the Configure button where it says Connect QTrobot to the Internet
- Select your WiFi name from the list and press *Connect. If it does not show up, press Refresh.
- If it asks, enter your WiFi passcode to connect.
- It will take around 10 seconds to connect. You will see the confirmation message on the tablet and the WiFi connection information on the left side of the panel.
Step 3. Connect the tablets to your home WiFi
- Close both apps (Learner and Educator)
- Restart the QTrobot (turn off and on)
- Connect your tablets to your home/office WiFi.
- Open the apps and start.
- If for any reason QTrobot can not connect to your WiFi:
- first double check that you have entered the correct passcode for your router.
- restart the robot and the Educator app and try again.
- If after connecting the robot to your WiFi you notice some issues with the apps such as games are no running,
- Close both the Educator and Learner apps
- Restart the robot
- Connect both tablets' WiFi directly to the QTrobot's WiFi (e.g. QTRD000100)
- Open the apps and try again
Congratulation. You are all settled and ready to start programming with QTrobot Studio. Now you can follow plenty of exciting Tutorials.
Footnotes
-
Only use the provided power supply with your QTrobot. ↩