Quick start with coding on QTrobot
This document guides you towards quick start coding on the QTrobot using programming languages. If you are looking for graphical programming, please take a look at Quick start with QTrobot studio.
1. Understanding QTrobot architecture
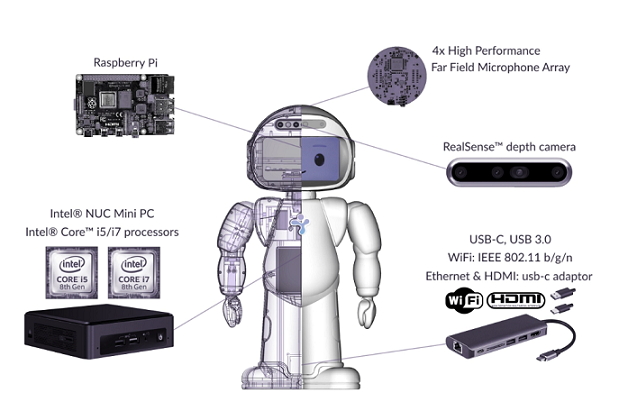
QTrobot is a high-end research platform with powerful computers and state-of-the-art hardware such as 3D camera and far-field microphone array. It comes with two computers: i) QTRP, a Raspberry Pi based computer to control the main hardware and ii) QTPC, an Intel® NUC i5/i7 PC to provide more computational power and to accelerate software development cycle. Both computers run on Ubuntu/Debian Linux operating systems and leverage ROS to offer easy-to-use yet very flexible software architecture. QTrobot's hardware is easily extendable via USB-C and USB adaptors, for example, to connect external monitor, keyboard and mouse. QTrobot also provides a rich set of APIs for several programing languages such as C++, Python and JavaScript.
Internal Setup
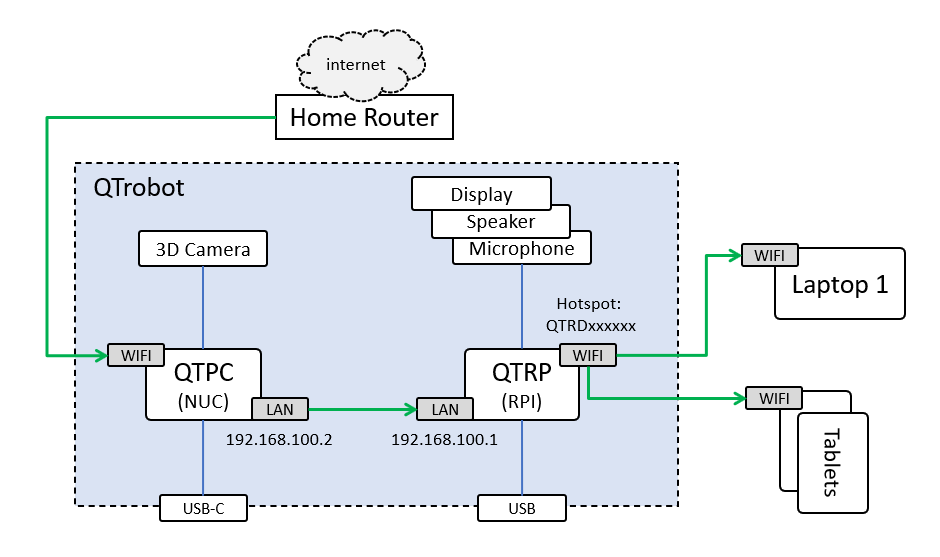
As it is shown in the following diagram, QTrobot consists of two computers, one in the QTrobot head (QTRP) and the other in the body (QTPC), which are internally connected via ethernet cable. All of the QTrobot devices such as display, speakers, microphone and motors are connected to QTRP except the 3D Camera which is connected directly to QTPC. The Wi-Fi of the QTRP is used to create the QTrobot hotspot with the same SSID as the robot’s serial number (e.g. QTRD000101).
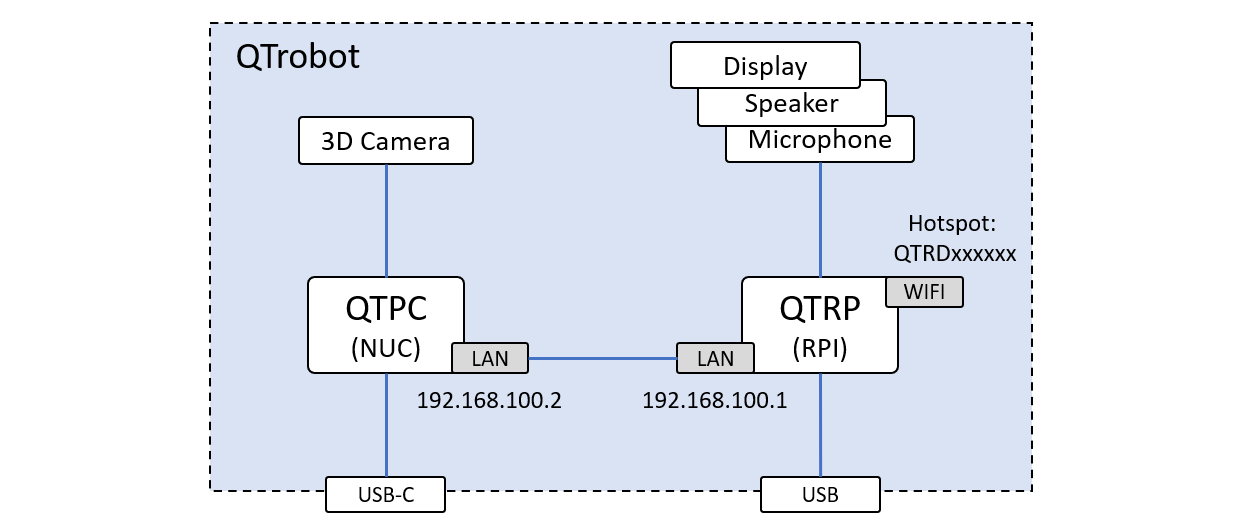
Both computers are configured to interact in one ROS environment. Upon starting the QTrobot, QTRP runs the roscore and initializes the ROS environment. It also turn on QTPC via wake-on-lan when the ROS environment is up. You will also find two USB port at the back of the QTrobot. One of the is attached to QTRP and the second one (USB-C) is connected to QTPC. This USB-C port can be used to connect keyboard,mouse and monitor via a USB-C extension hub to QTPC.
QTPC is already prepared and configured to work with roscore which is running on QTRP and you can access all QTrobot ROS services ands topics.
2. Prepare your setup
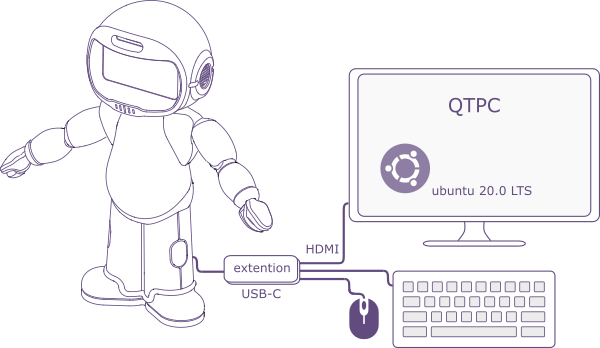
There are few ways of developing code for QTrobot. We strongly recommend you to start developing directly on QTrobot's integrated QTPC. As it is shown in the following picture, you need to prepare:
a keyboard,
a mouse,
and a monitor with HDMI cable.
Step 1. Turn on QTrobot
To power the QTrobot on, simply connect the QTrobot's power supply1.This triggers the power on process and your QTrobot becomes ready less than a minute. After powering on, you can see the QTrobot face is on and the motors are in their home position. If the QTrobot is already connected to the power supply simply push the power button to turn on the QTrobot.
Step 2. Connect keyboard/mouse and monitor to QTPC
Connect keyboard, mouse and HDMI Monitor to your USB-C extension then plug it in the USB-C port at the back of QTrobot.
Step 3. Wait for QTPC to boot
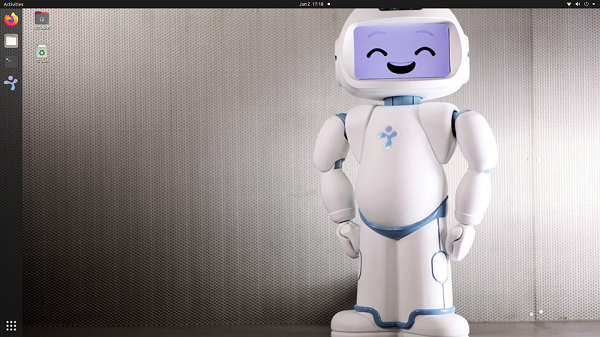
After you turned on your QTrobot it will need some time until your QTPC turns on, because QTRP will turn on QTPC after ROS environment is up. You will see the Ubuntu desktop of QTPC and you can use in the same way you use a standard desktop for development.
To power off the QTrobot simply press the power button on the back of the QTrobot. This will turn off both QTRP and QTPC. Wait enough for QTrobot to turn off before unplugging it from power supply: a blue screen shows up immediately goes off.
Now you should be all settled and ready for coding. However, in most cases you need to have access to the internet. So let's follow the next section to connect your QTrobot to your home/office router and the Internet.
3. Connect QTrobot to a home network and Internet
The older version of QTrobot's (which had been released before May 2021) have different operating system for QTRP. Those set of robots (with QTRP version older than QTRDTP2105) require slightly different set of steps for connecting them to the Internet. Please carefully do the following steps to find the version of your QTRP.
1. ssh to QTRP and run the following command to check the codename of its operating system:
From the Ubuntu desktop of QTPC, open a terminal and access QTRP via ssh:
ssh developer@192.168.100.1
# or ssh developer@QTRP
For the password use qtrobot.
lsb_release -c
2. if the codename is xenial then the version of your QTRP is older than QTRDTP2105.
- Recent QTrobots
- QTrobots older than QTRDTP2105
The following diagram demonstrates a common scenario where different devices (e.g. laptops) are connected to the QTrobot via it's Wi-Fi hotspot. The Wi-Fi of QTRP is setup to operate in AP/STA mode. That means the QTRP's Wi-Fi can be connected to a home router (as Wi-Fi client) and at the same time operates as hotspot (access point). To have access to the internet on all machines (as shown in the diagram), the Wi-Fi of QTRP should be connected to the home router. The internet from the home router, therefore is shared to all other machines (including QTPC) via QTRP. The green arrows shows the direction and how internet shared between QTRP, QTPC and any other devices connected to QTrobot hotspot.

Therefore, you need to connect the QTRP to your home router's Wi-Fi. To do that do the following steps:
Step 1. Access QTRP via ssh
From the Ubuntu desktop of QTPC, open a terminal and access QTRP via ssh:
ssh developer@192.168.100.1
# or ssh developer@QTRP
For the password use qtrobot.
Step 2. configure the wpa_suplicant for wlan0
Edit the /etc/wpa_supplicant/wpa_supplicant-wlan0.conf file to update ssid and psk accordingly.
cd /etc/wpa_supplicant
sudo nano wpa_supplicant-wlan0.conf
set the ssid (your router ssid) and psk (your router passphrase) of your home router setup:
country=LU
ctrl_interface=DIR=/var/run/wpa_supplicant GROUP=netdev
update_config=1

network={
    ssid="<your router SSID>"
    psk="<your router passphrase>"
}
- Pay attention that the values for ssid and psk are wrapped with double quotation marks!
- Pay attention to the
<TAB>before ssid and psk! - Do not create or change any other files related to wpa_supplicant or systemd network! this may break your QTrobot network setup!
- Ensure that you are modifying the
wpa_supplicant-wlan0.conffile and NOTwpa_supplicant.conf
Step 3. Restart wpa_supplicant@wlan0 service and check the connectivity
from the ssh terminal of QTRP type:
sudo systemctl restart wpa_supplicant@wlan0.service
Alternatively, you can restart your QTrobot. After following the above steps, your QTrobot should be connected to your home/office network and have access to the Internet (i.e. you should be able to ping www.google.com for example).
ping www.google.com
You are all settled! QTRP gets internet connection from your router and will automatically share it with QTPC and any other devices connected to QTrobot Wi-FI hotspot.
- Check if QTrobot is connected to your home/office network. Run the following command on QTRP via ssh:
sudo wpa_cli -i wlan0 status. You should seewpa_state=COMPLETEDand the correctssidis reported. - Double check that you have entered correct values for
ssidandpskin/etc/wpa_supplicant/wpa_supplicant-wlan0.conf! - See the status of the wpa_supplicant@wlan0 service for any typo or misformatted lines in
/etc/wpa_supplicant/wpa_supplicant-wlan0.conf. To do that, run the following command on QTRP:sudo systemctl status wpa_supplicant@wlan0.servicethis should shows that the service is running and active. If not, follow the error messages reported by the service. - If you are connected to your home/office network (by checking the previous command) but still does not have access to the internet (e.g. cannot ping google), please double check that your home/office network providing any internet connection!
Do not use the QTRP Wi-Fi to connect to a network for QTrobot older than QTRDTP2105. Instead, use Wi-Fi from QTPC as explained bellow!
The following diagram demonstrates a common scenario where different devices (e.g. laptops) are connected to the QTrobot via it's Wi-Fi hotspot. To have access to the internet on all these machines, the Wi-Fi of QTPC should be connected to the home router. The internet from the home router, therefore is shared to all other machines via QTPC. The green arrows shows the direction and how internet shared between QTPC, QTRP and any other devices connected to QTrobot hotspot.
Therefore, all you need to do is to connect the QTPC to your home router's Wi-Fi. After your QTPC gets internet connection, it will automatically share it with QTRP and any other devices connected to QTrobot Wi-FI hotspot.
- Access the QTPC ubuntu desktop (see Working on QTPC)
- Open the system menu from the right side of the top bar .
- Select Wi-Fi and click Select Network.
- Click the name of the network you want, then click Connect. ...
- If the network is protected by a password (encryption key), enter the password when prompted and click Connect.
4. Optional ways of working with QTrobot
- Working with your ROS Setup
- Working via SSH
Step 1. Setup your ROS environment
For this steps you will need ROS installed on your computer. If you don't have it please follow this installation instructions
-
Install QTrobot ROS headers files on your laptop
Clone QTrobot Software repository.
cd ~/
git clone https://github.com/luxai-qtrobot/software.git
Copy the
headersfolder or make a link in your Catkin source workspace:cd ~/catkin_ws/src
ln -s ~/software/headers ./Build the messages in your Catkin worksapce
cd ~/catkin_ws
catkin_make -
Configure ROS environment for QTrobot
Connect to the QTrobot Wi-Fi hotspot. Then open a terminal on your PC and run the following command:
ifconfigWrite down or copy IP address that is written of WiFi inet (e.g.
inet 10.42.0.55)wifi0: flags=4163<UP,BROADCAST,RUNNING,MULTICAST> mtu 1500
inet 10.42.0.55 netmask 255.255.255.0 broadcast 10.42.0.255
inet6 fe80::c5ab:2083:f0c2:daa3 prefixlen 64 scopeid 0xfd<compat,link,site,host>
ether e4:b3:18:dd:87:31 (Ethernet)
RX packets 0 bytes 0 (0.0 B)
RX errors 0 dropped 0 overruns 0 frame 0
TX packets 0 bytes 0 (0.0 B)
TX errors 0 dropped 0 overruns 0 carrier 0 collisions 0Edit
~/.bash_aliaseson your laptop/PC and add following lines. Change ROS_IP to your IP from last step.source /opt/ros/noetic/setup.bash
source ~/catkin_ws/devel/setup.bash
## QTrobot
export ROS_IP=<your PC IP address>
export ROS_MASTER_URI=http://192.168.100.1:11311To apply this configuration run this command:
source ~/.bash_aliases
Step 2. Test your setup
Last step is to connect to the QTrobot Wi-Fi hotspot and test your ROS environment. One option is to list all ROS topics that are running on QTRobot:
rostopic list
If everything is working you should see output similar to this one.
/rosout
/qt_robot/audio/play
/qt_robot/behavior/talkAudio
/qt_robot/emotion/show
/qt_robot/gesture/play
/qt_robot/head_position/command
/qt_robot/joints/state
...
or call some of the QTrobot ROS interfaces:
rosservice call /qt_robot/speech/say "message: 'Hello.'"
You will hear QTrobot say Hello.
Alternatively you can directly SSH to QTPC from your laptop to develop code on the QTrobot.
- SSH to QTRP
- SSH to QTPC
To ssh to QTRP, first connect your laptop to the QTrobot Wi-Fi hotspot and run the following command2. You can alternatively run the following command from QTPC's terminal. For the password use qtrobot.
ssh developer@192.168.100.1
For some older version of QTrobot's you need to ssh with qtrobot user instead of developer (i.e. ssh qtrobot@192.168.100.1). For the password use qtrobot.
To ssh to QTPC, first connect your laptop to the QTrobot Wi-Fi hotspot and run the following command2. For the password use qtrobot.
ssh qtrobot@192.168.100.2
Alternatively you can ssh to QTPC via QTRP with the same command.
Congratulation. You are all settled and ready to start programming with QTrobot. Now you can follow plenty of exciting Tutorials.
Footnotes
-
Only use the provided power supply with your QTrobot. ↩
-
Windows users can use Putty (www.putty.org) ↩ ↩2